Overview | Contents
Data Mining Cross Tabs (XTabs):
Data Mining XTabs is the powerful feature of the cBizOne
application, all the information is at your finger tips with few clicks away. Information
can be viewed from any Entity level. This information can be customized to view the
Data Mining info the way you want it. From with in the XTabs you can access any
information you need instantly.
Following are the XTabs for the Contact Entity, which shows
all the information for each Contact selected:
QNotes
- To add notes, click on Date Stamp Button. It will create an entry with User ID
with date stamp.
- Enter your notes for the item. Notes will be saved automatically.
Go to Top
Activities
Shows all the Activities viz. Call, Meeting or Interview pending for this
Contact.
- Right click on any of the item and select Complete if the Activity is
completed.
- Right click on any of the item and select Schedule to reschedule a
Call, Meeting etc.
- Right click on any of the item and select Note to write a note for the
Activity.
- Right click on any of the item and select Document to attach a document
for the Activity.
- Right click on any of the item and select Open to modify or to see the
details of Activity.
- Right click on any of the item and select Delete to delete the
Activity.
Go to Top
History/Notes/Mails
Shows all the history viz. Activities completed, Note, Sent and received mails
for this Contact.
- Right click on any of the item and select Open to open the history
item.
- Right click on any of the item and select Delete to delete the history
item link for this Contact.
Go to Top
Requirements
Shows all the Jobs received from this Contact.
- Right click on any of the item and select Schedule to schedule a Call,
Interview etc with the contact for this Requirement.
- Right click on any of the item and select Note to write a note for the
Activity.
- Right click on any of the item and select Document to attach a document
for the Activity.
- Right click on any of the item and select Status for tracking
placements with the contact for this Requirement if you placed a consultant.
- Right click on any of the Requirement item column and select Go TO if
it is enabled, to view more information of that column(Contact or
Consultant or Requirement) and click Back button on the Tool Bar to go to previous folder you are in.
- Right click on any of the Requirement item column and select Open if it
is enabled, to update or to see the information of the Requirement.
Go to Top
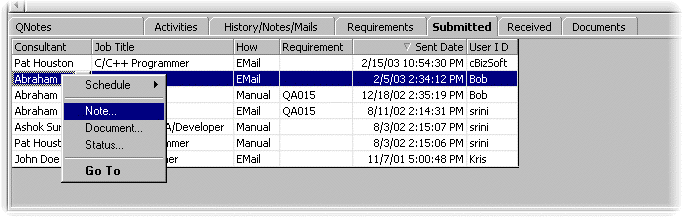
Submitted
Shows all the Consultants submitted to this Contact through Email or manually.
- Right from the submittals you can schedule the interviews, calls, note and placements,
against the current Contact, the Consultant and if any to a requirement, just by by right
clicking on any of the submittal.
- Right click on any of the submittal column and select Go TO if it is
enabled, to view more information of that column(Contact or Consultant or
Requirement) and click Back button on the Tool Bar to go to previous folder you are in.
- Right click on any of the submittal column and select Open if it is
enabled, to update or to see the information of the submittal.
Go to Top
Received
Shows all the Consultants received from this Contact.
- By right clicking on any of the item, you can schedule the interviews, calls, note and
placements, against the current Contact and the Consultant.
- Right click on any of the item column and select Go TO if it is
enabled, to view more information of that column(Contact or Consultant or
Requirement) and click Back button on the Tool Bar to go to previous folder you are in.
- Right click on any of the item column and select Open if it is enabled,
to update or to see the information of this item.
Go to Top
Documents
Shows all the documents attached to this Contact.
- Right click on any of the item and select Open to see the detail
information of this item.
- Right click on any of the item and select Open Document to open the
respective document.
- Right click on any of the document and select Email Document to Email
the respective document to the Contact.
- Right click on any of the document and select Delete Document to delete
the respective document link from the Contact. Your original document will not be
deleted.
Go to Top
|
|
